We are reader-supported, earning a commission when you purchase through our links. There’s no extra cost to you. Thanks for your support! Full disclosure here.
If you’re trying to figure out how to create a custom email address to match your website’s domain name, and want to be able to use the familiar Gmail inbox just like the one you use for your personal email, there are 2 options to consider. Below, we’ll outline these options and explain how to implement each one.
Option 1. Enable Gmail To Work With Your Custom Email Domain (Free If You Already Have Web Hosting)
This free option allows you to enjoy all the great features that come with a regular Gmail account while sending emails from your email domain for free. I should note that this option requires you to have email hosting, which you may unknowingly already have from your web hosting provider.
Your website hosting provider will very likely include this with your current plan, meaning you will not have to pay anything extra, so check with them. If this is not the case, you will need to pay for them to provide you with email hosting as an additional service. Once you’ve done that, you’ll sign up for a Gmail account if you don’t already have one, configure the emails to work through that account, and enable Gmail to send emails with your custom email address.
You can then immediately start using your new, professional email address for your startup, blog, business website, or nonprofit. Without a doubt, this is your best free option for using Gmail with your email domain.
I should mention that as of late, I have been receiving more complaints than ever from readers who use this method, who claim that many of the emails they send end up going to people’s spam folders. At first, I wasn’t sure if these complaints were legitimate, and then it started happening to me with an email address that’s been working well for 10 years. So now I’m certain that using this option, while more cost-efficient, may cause you to run into issues with spam filters.
If you still want to move forward with this option, that’s perfectly fine. The process of setting it up sometimes scares people away because it sounds complicated, but it’s really not, and I will walk you through it step-by-step below.
Option 2. Sign Up For Google Workspace (Recommended)
While the first option will save you some money, I recommend just signing up for Google Workspace instead. It’s much simpler and more reliable than the first option listed above. In addition to using Gmail with your domain email, you’ll have access to tons of extra features that make it easier to collaborate, store documents, share files, and even add or remove user accounts for other people on your team who use your domain name in their email addresses:
- For example, I have multiple @thedigitalnonprofit.com emails that I can use depending on the situation, like info@thedigitalnonprofit.com, jason@thedigitalnonprofit.com, etc.
- When I hired a contractor, it took 2 seconds to give them a name@thedigitalnonprofit.com email so we presented a consistent brand
- During the contract, I could make files & events shareable with all our employees to collaborate easily
- When the contract ended, I could freeze their accounts with 1 click, so my info was safe
All of those benefits were possible because I had Google Workspace. They offer a 14-day free trial, so you get a better sense of what it’s like to use all their features. In addition, they provide promo codes that help save 15% off for the first 3 months.
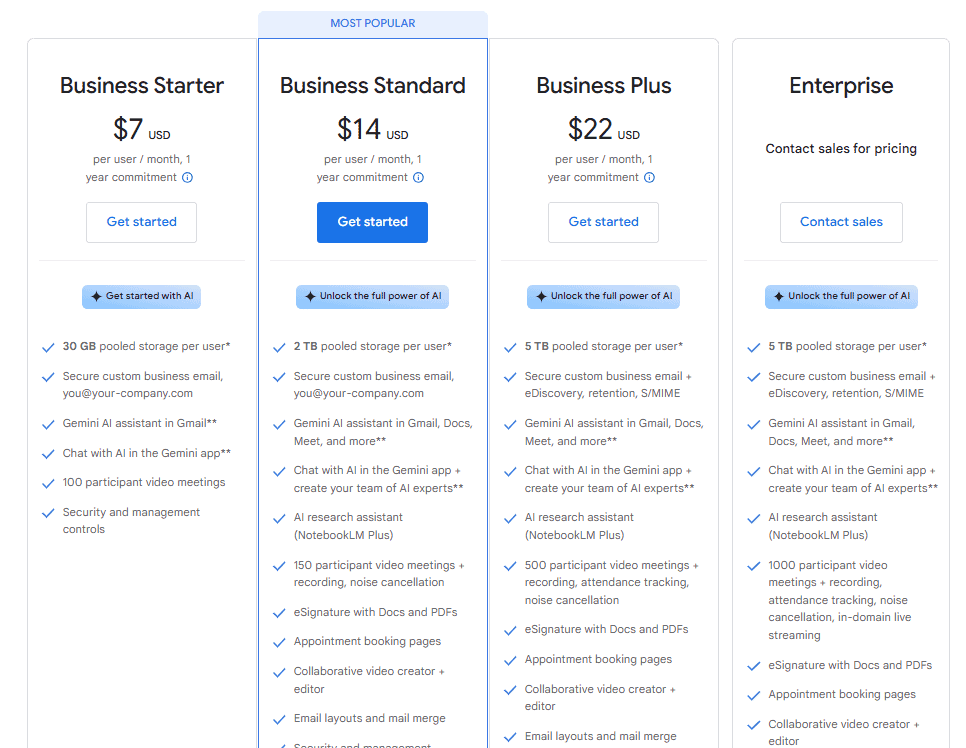
This promotion is available for the Business Starter, Business Standard, and Business Plus packages. The main differences between the plans are as follows:
| Business Starter | Business Standard | Business Plus | |
| Price | $7/month | $14/month | $22/month |
| Storage Space* | 30 GB/user | 2 TB/user | 5 TB/user |
| Custom Domain Email | |||
| Gemini AI Assistant | Gmail | Gmail, Docs, Meet, and more | Gmail, Docs, Meet, and more |
| Video Meeting Participants | 100 | 150 | 500 |
| AI Research Assistant | |||
| eSignature | |||
| Appointment Booking Pages | |||
| Collaborative Video Creator + Editor | |||
| Meeting Attendance Tracking |
*Storage space is pooled between all the users in your account
In general, the Business Standard plan is only worth the extra money if you have many heavy files, such as videos and audio recordings that you need to store. The Business Plus is for large organizations with hundreds of employees.
Each promo code is unique and can only be used once. To receive your exclusive 15% coupon for Google Workspace, submit your email address under the plan that’s best for your needs.
For your convenience, we will display your code in a pop-up on this page in addition to sending it to you via email in case you prefer to sign up later.
Get 15% OFF Google Workspace for 3 Months
Sign up Below to Receive a Coupon
Business Starter Plan Coupon
Business Standard Plan Coupon
One last note—if you’re a registered nonprofit, you can get Google Workspace at a discounted rate, or even for free through Google for Nonprofits. Regardless of whether you’re a nonprofit or for-profit organization, it’s best to take the long-term view and sign up to get all of Google’s business productivity tools, especially given that you can save a few extra dollars by using our Google Workspace promo codes. If you want to switch later, it will be a pain to transfer all your emails to Google Workspace.
Once you sign up for Google Workspace, setting up your email account to use your custom email domain is pretty simple. You can jump to the section below by following this link, where I provide detailed instructions.
If you still want to try the free method described in option 1 above, here’s how you can use Gmail with your custom email address.
How to Enable Gmail to work with your Custom domain name for Free
I’m going to show you how to set up Gmail so you can use it for free. Using this method, you can send out and receive emails using your custom domain name from your regular Gmail inbox.
When you go to create a new message, you’ll just choose which sender account to use. For personal emails, you’ll send them using your standard Gmail address. For business emails, you’ll just choose your custom domain as the sender. Gmail is smart enough that if you reply to an email, it will automatically use the email address that received the message.

Some things to know about sending emails this way
The Gmail portion of this method is 100% free. However, you will need to have an email host to make it work. If you are already working with a web hosting service, they can most likely provide you with email hosting. If not, you can just sign up with Bluehost to receive low-cost, professional web hosting services.
I recommend them because they are one of the most affordable services on the market. Their plans start at about $2.95 a month, which includes hosting for your website, email hosting, and free domain name registration for 1 year. On top of that, they offer a 30-day money-back guarantee and 24-hour customer support. If you don’t need a website but still want an email domain, you can always just purchase email hosting from another provider.
Regardless of which provider you choose, once you have email hosting taken care of, you can use the following steps to help you set up Gmail so it works with your custom email at no extra fee.
In this tutorial, I’m going to use screenshots from the customer dashboard at Bluehost, but this method works with any host. It will just have a slightly different graphical interface. I also included step-by-step directions for several other popular web hosts.
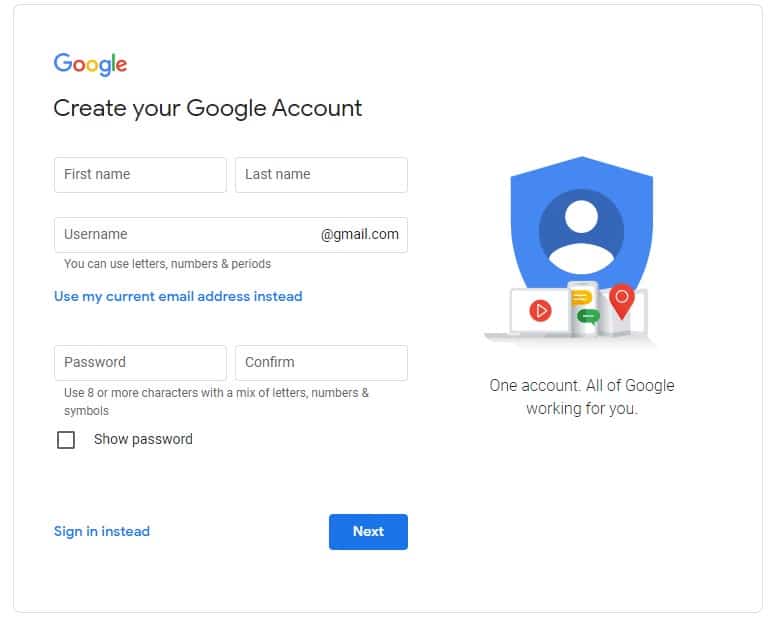
Step 1: Create A Gmail Account
You probably already have a personal Gmail account, and you could use it for your custom email, but I recommend keeping your personal and work Gmail accounts separate; it will make things a lot easier down the road if you upgrade to Google Workspace or Google for Nonprofits. So, if you want to create a new free Gmail account, follow these steps:
- Create a Gmail account here and pick a new email address. An address like yourname.organization@gmail.com usually works well.
- Follow the rest of the steps to verify your phone number, create your account, and sign in.
Step 2: Create Your Professional Email Address
If you don’t already own the domain name you plan to use with your email, you’ll need to purchase one from a domain registrar. If you don’t have a website host either, you may as well sign up with Bluehost to receive a free domain name with your hosting account.
With Bluehost, you’ll need to create an email account. While it might be tempting to click on the Email and Office button to set up your email account, that will take you to a page where you can purchase Google Workspace. Instead, click the “Advanced” button on the left navigation menu.
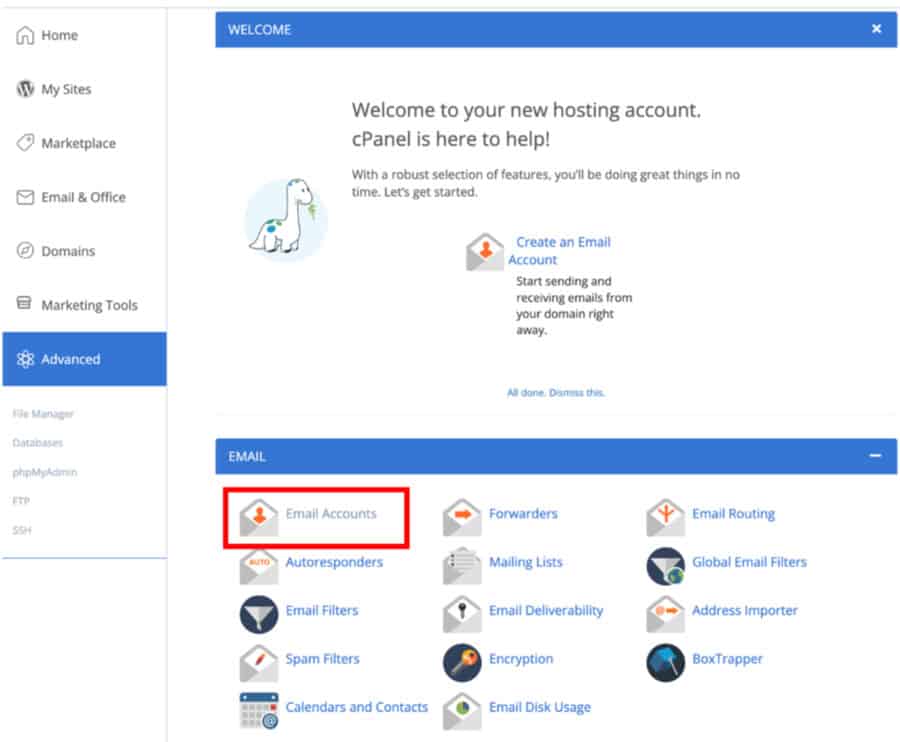
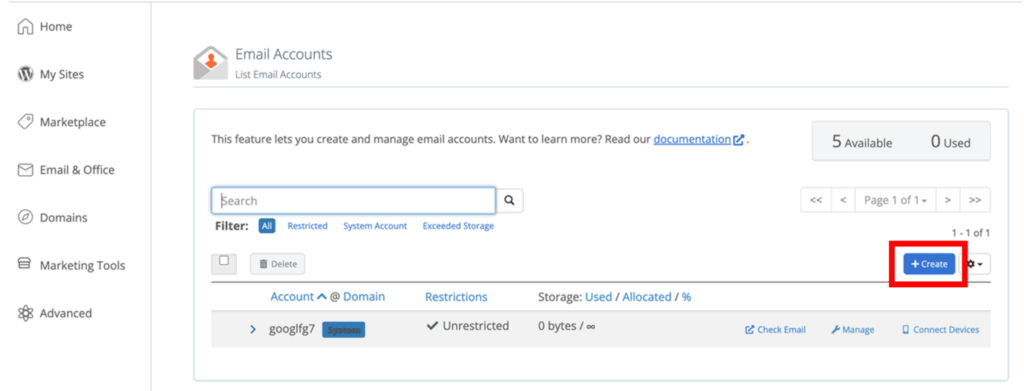
- Click on the “Email Accounts” icon in the email section. A new screen will open with a list of all your existing email accounts. At this point, there shouldn’t be anything there.
- Click “Create” to add your first email address
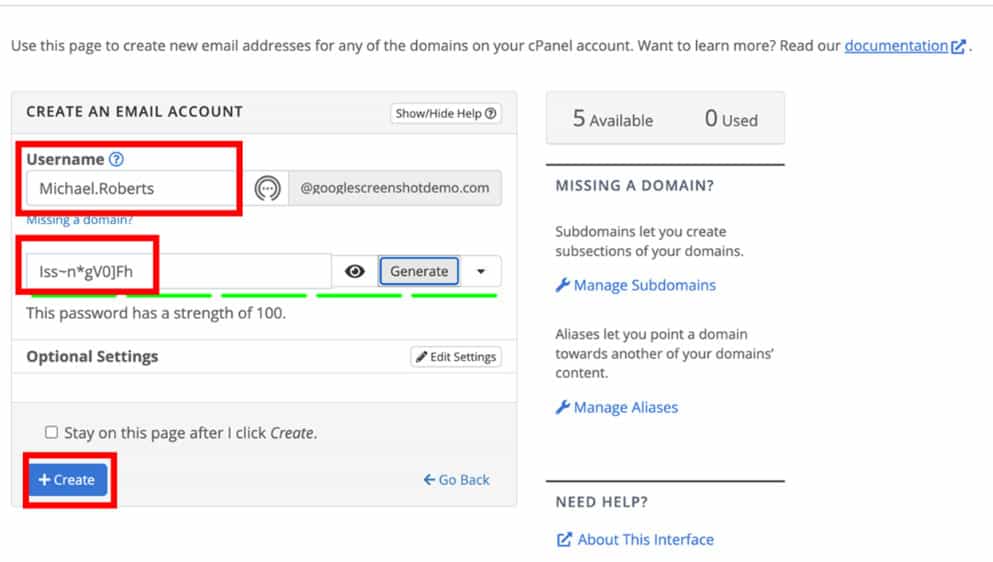
- Type in the username you want to use for your email. Remember, whatever username you choose is your email domain. You may want to use your name or something like Info or Office.
- Enter a secure password. You’ll need to remember this and use it when connecting to your Gmail account.
- Click the “Create” button at the bottom of the screen.
You can create multiple accounts and link them all to your Gmail account. Just repeat these instructions until you are done. When you are finished, you can see all your email addresses in a list.
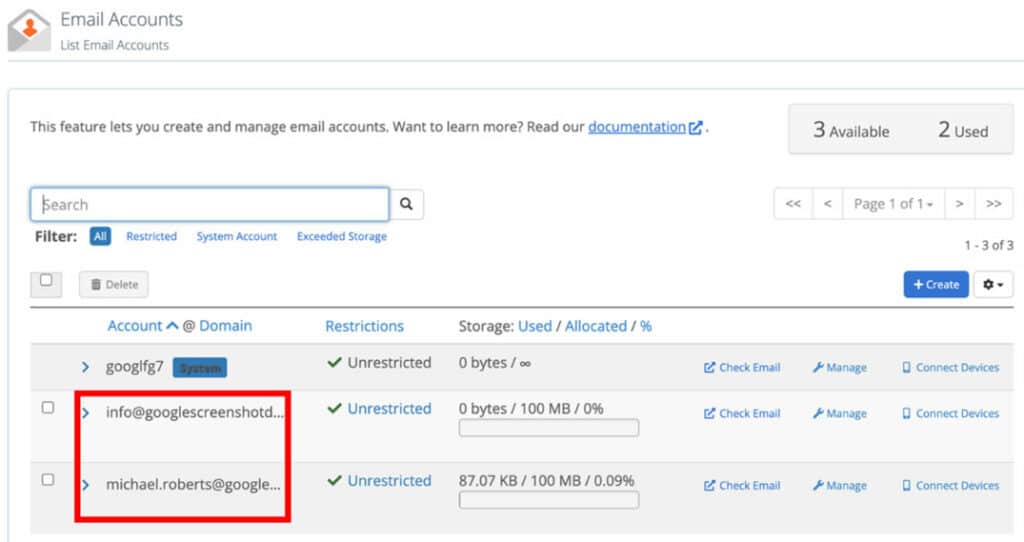
Step 3: Set up Gmail to receive email
There are two ways to receive an email in your Gmail account. You can either use POP3 or email forwarding. While both options work, POP3, where Gmail receives emails directly from the server, is a better solution. Each email can be labeled, making it easy to differentiate between work emails and personal emails. With forwarding, every email goes through the original account and is then automatically forwarded to your new address. Below are instructions on how to configure each method.
How to Set up Gmail to Receive Email Using POP3
POP3 sounds intimidating, but it’s pretty simple. It lets Gmail connect to your custom email address. Your free Gmail account will import email from your email host.
To get started, you’ll need to log in to your Bluehost account, or whichever provider is hosting your emails.
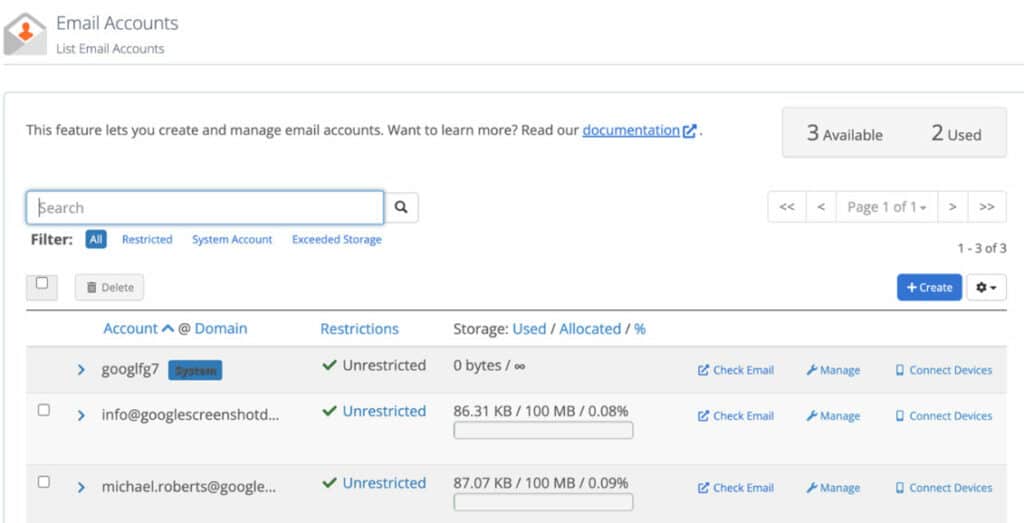
- Begin by clicking “Advanced” on the left navigation menu, and then choosing “Email Accounts.” This will open a list of your email accounts.
- Click on the “Connect Devices” on the row of the account you want to see in Gmail.
- Scroll down to a section called “Mail Client Manual Settings,” which includes your username, incoming server name, and POP3 Port. You will need these pieces of information for Gmail.
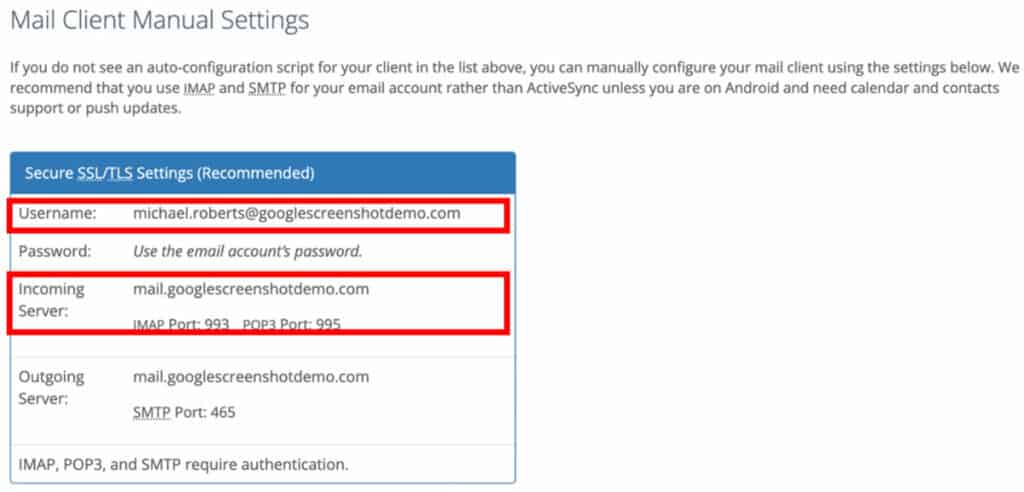
In another tab, open your Gmail account.
- Open Gmail settings by clicking on the gear icon in the top right corner and then clicking the “See all settings” button
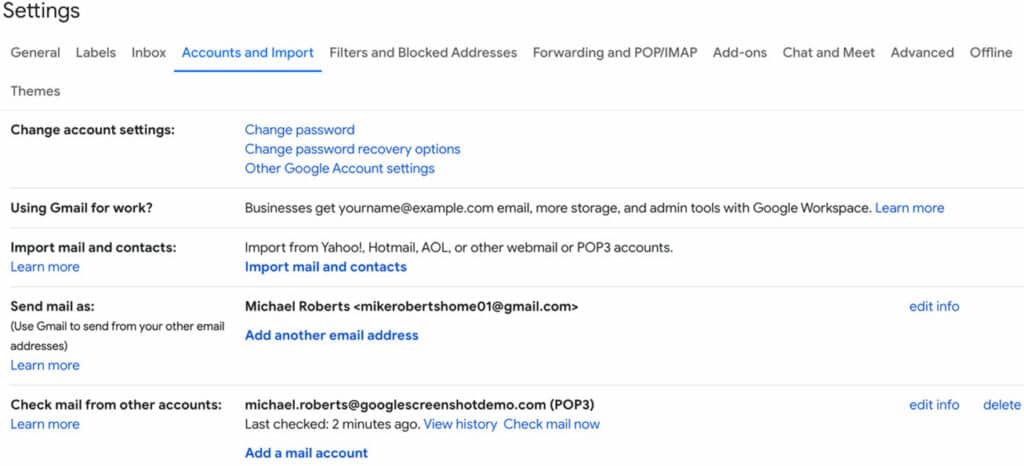
- Click on the “Accounts and Import” tab in the center of the screen
- Find the option that says: “Check mail from other accounts.” Click on “Add a mail account.”
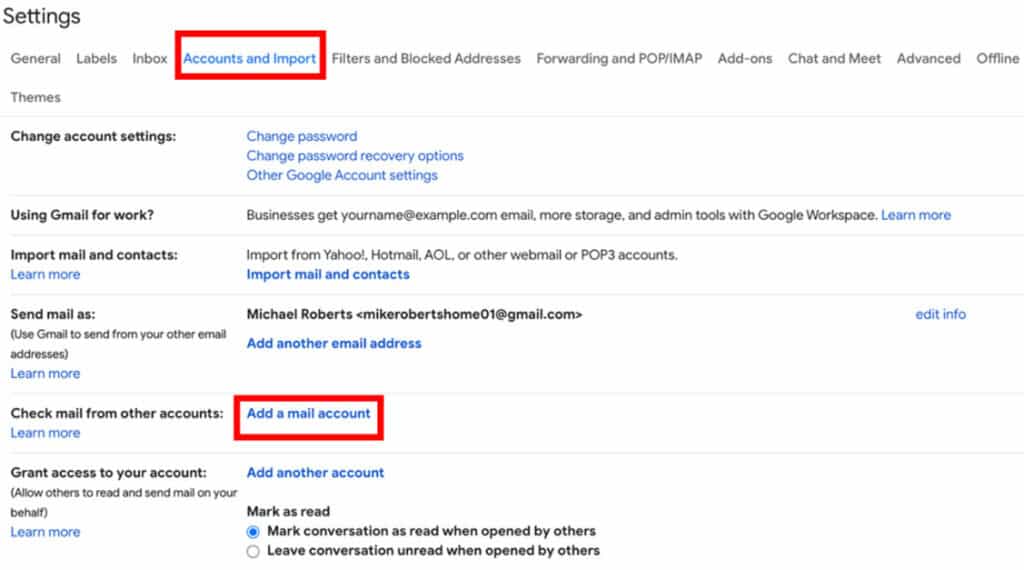
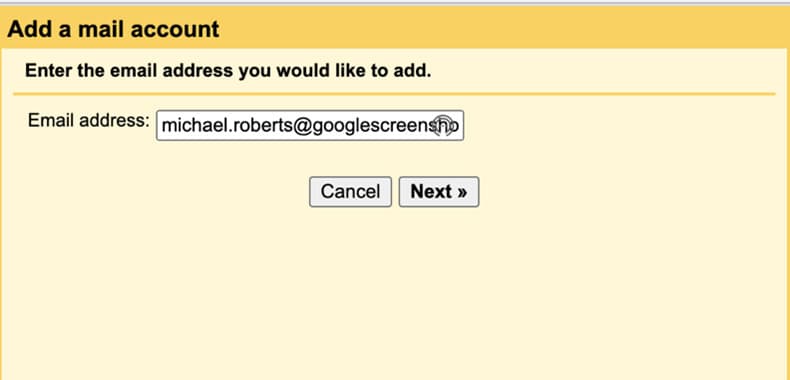
A new window will open, asking for your email address. Enter your new business email address into the window and click Next.
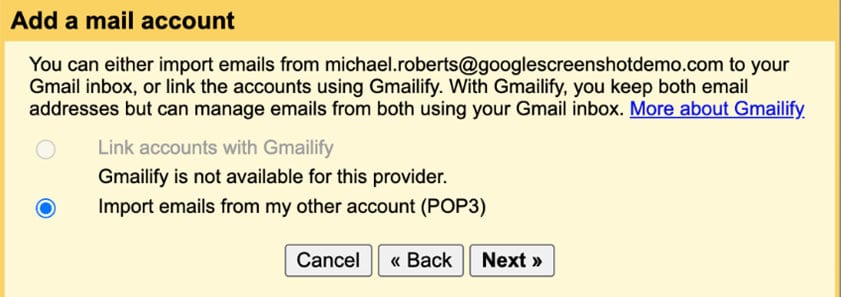
On the next window, click the radio button next to the option to Import emails from my other account (POP3) and click “Next.”
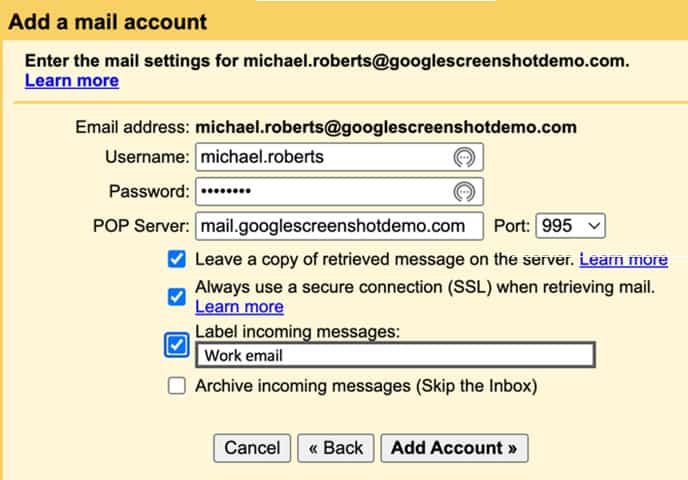
On the next window, you will need to enter the following information:
- Username – This can be your full email address or just the part before the @ symbol.
- Password – This is the password you created in Bluehost
- POP Server and Port Number – This is the incoming server name and POP Port number from Bluehost.
- Check the box next to Leave a copy
- Check the box next to Always use a secure connection
- Optional – check the box next to Label Incoming messages – This will help you track the source of an email, especially if you are connecting multiple email addresses to one Gmail account. I’ve labeled all emails as Work emails
- Click “Add Account.”
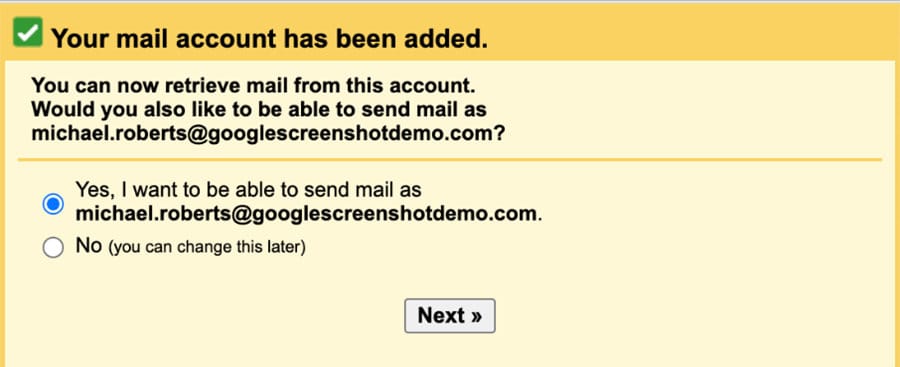
You will see a confirmation that the email account has been added.
You can also see that your Gmail account is checking for email from your work account on the same settings screen we looked at a few minutes ago. To add additional accounts, click the “Add a mail account” button.
How to Set up Gmail to Receive Emails via Email Forwarding
As mentioned above, you can either forward emails to your Gmail account or set up POP3. There is no need to do both. All things being equal, I’d recommend setting up POP3.
Below are the forwarding instructions for several different web hosts.
If your host isn’t listed: Look at the HostGator instructions–chances are you have the same cPanel admin interface.
If that doesn’t work: Your provider might not include email forwarding. You can transfer it to Bluehost for a web hosting package that includes email forwarding. Just sign up with them here, and they will walk you through the seamless transfer process.
Using This Method With Bluehost
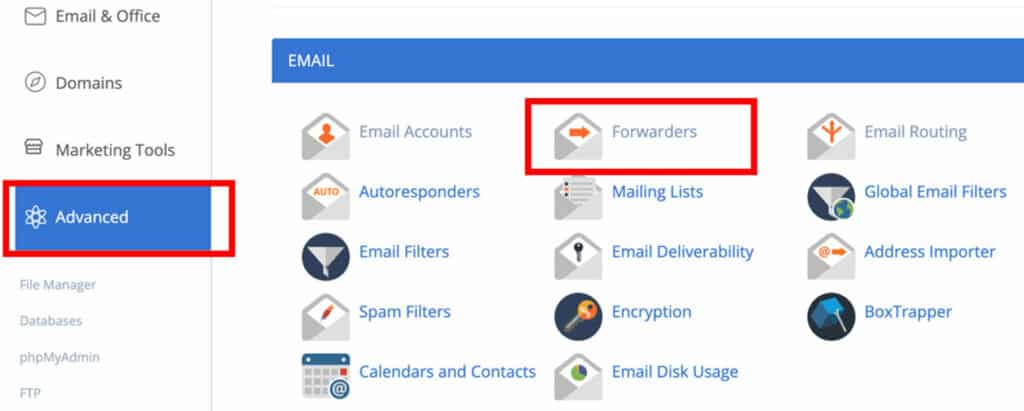
Click “Advanced” on the left navigation menu, and click on the “Forwarders” icon
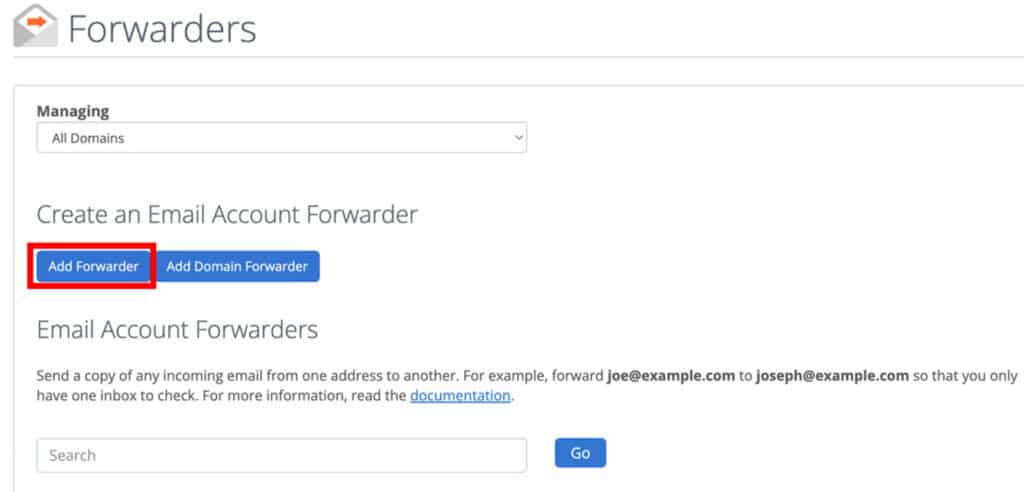
Click the “Add Forwarder” button
- Enter the name of your Bluehost email account that you would like to forward in the Address to Forward field.
- Enter the destination email address in the Forward to Email Address field (This should be the Gmail account you created)
- Click the “Add Forwarder” button
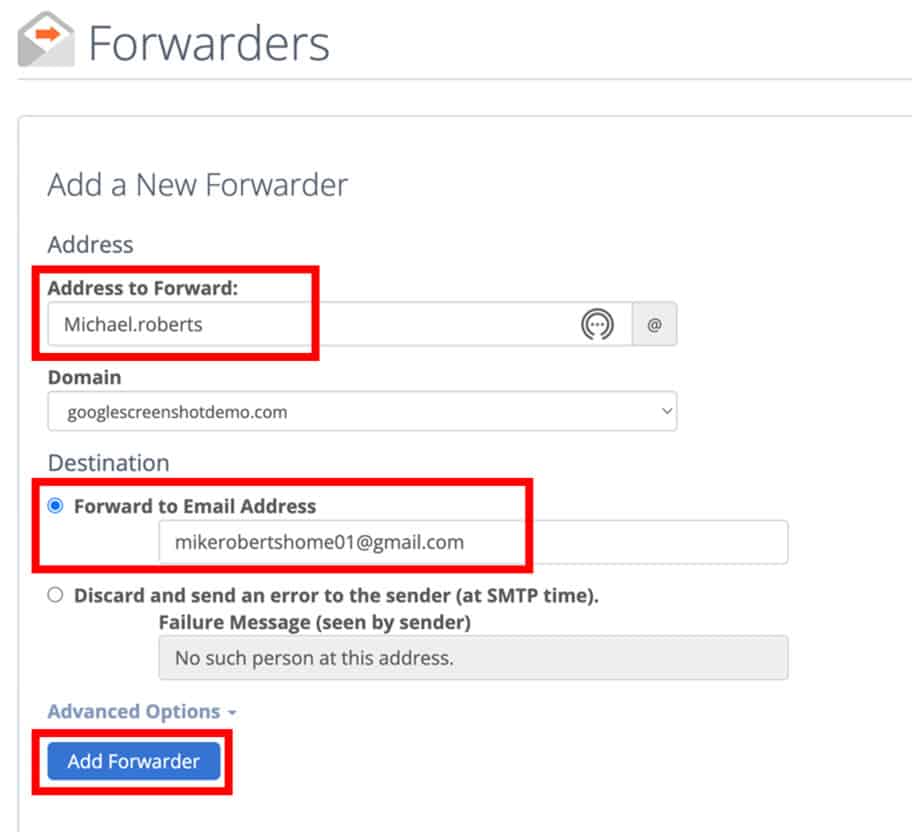
- Add as many emails as you would like. In this example, I added my Michael Roberts email address and my Info email address
- To test the system, send yourself an email and see if it appears in your Gmail account. If it did, you have successfully set up incoming emails for free in your Gmail account.
Using This Method With HostGator or Any cPanel Host
- Log in to cPanel
- In the Mail section, click Forwarders
- Under the Email Account Forwarders section, click Add Forwarder
- Type in the Address to Forward (you@yourdomain.org)
- Select “Forward to email address” (you.organization@gmail.com)
- Click Add Forwarder
Using this Method With GoDaddy
*Please note that as of December 31, 2020, GoDaddy no longer offers email forwarding credits. If you have an account that was created before this date, you can follow the instructions below. If not, you will need to purchase Office 365 Email Essentials for $23.88/year and then go into the GoDaddy settings for email forwarding.
- Log in to your account and click your name in the top-right.
- Select My Products from the drop-down
- Scroll down to the section called Additional Products
- Click the arrow to reveal the Email Forwarding section
- Click the Redeem button
- Select your domain name (Email Forwarding 100 Pack) and click Redeem Credit
- Wait for the page to refresh
- Scroll down to the Workspace Email section
- Click the arrow to reveal your remaining credits for Email Forwarding
- Click Manage All
- You’ll be redirected to the Workspace Control Center (you may be asked for your login details)
- Click Create Forward
- Under Forward this email address, type the address you want to forward (you@yourdomain.org)
- Under To these email addresses, add your Gmail address
- Click Create
Using This Method With DreamHost
- Log in to your DreamHost Control Panel and select the relevant package
- Click the Manage Email Addresses link from the Mail panel
- Click the Set up forwards link located in the right corner of the page
- Choose a name and domain for the forwarding address (you@yourdomain.org)
- Type your Gmail into the Forward Target(s) box
- Click Save
Step 4: Enable Gmail to Send From Your Custom Email Addresses using SMTP
The previous sections were all about receiving business emails to your Gmail account. In this section, we are going to set up the sending functions, using something called SMTP. Like POP3, SMTP looks intimidating, but if you follow these step-by-step instructions, you’ll be sending out business emails from your Gmail account in no time. We’re going to start back at Bluehost, on the same screen where we found the POP3 information.
- Begin by clicking on the “Custom Devices” tab in your email account.
- You’ll see a section called Secure SSL/TLS Settings. The bottom part of the section has outgoing server information and an SMTP port. You will need these pieces of information for Gmail.
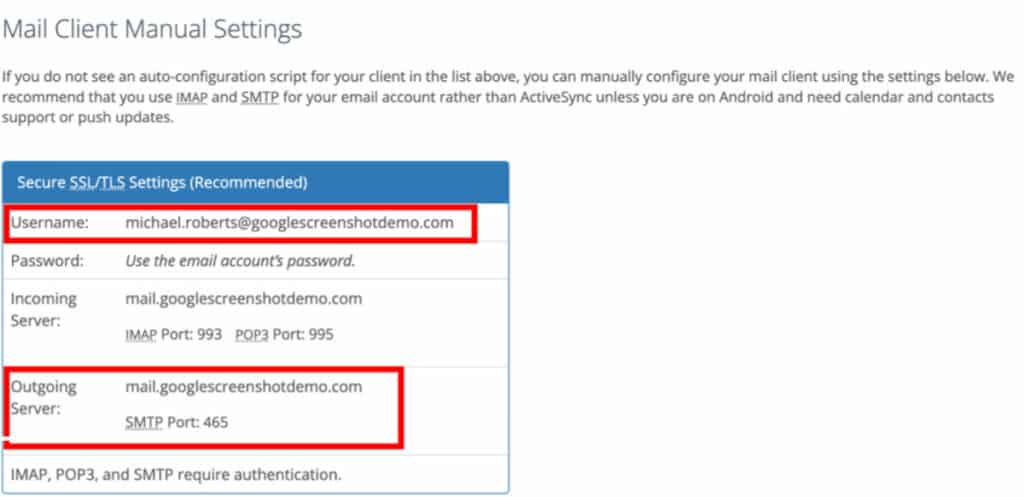
Once you have the information in front of you, it’s time to head back to Gmail.
- Open Gmail settings by clicking on the gear icon in the top right corner, and click the “See all settings” button
- Click on the “Account and Import” tab in the center of the screen
- Find the option that says: Send mail as. Click on “Add another email address.”
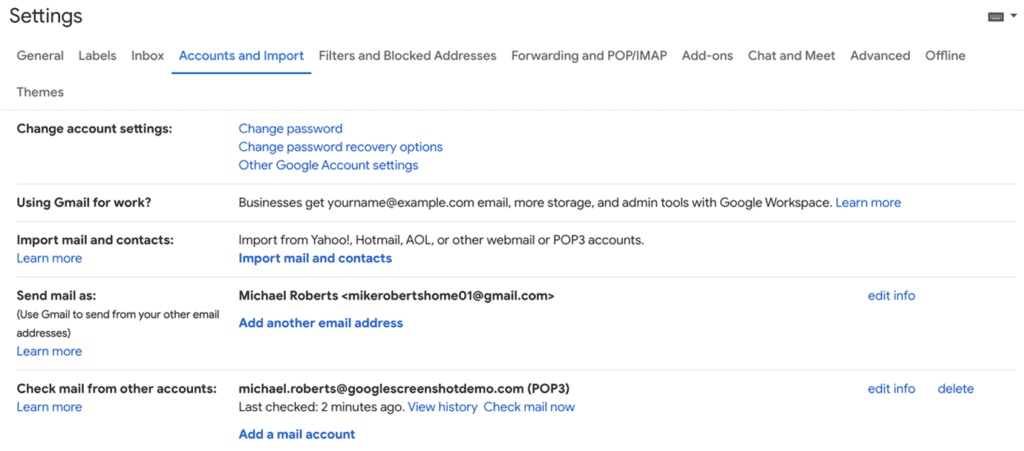
A new window will open. Enter the name you want an email recipient to see and your email address. Check the box next to Treat as an alias, and click “Next Step.”
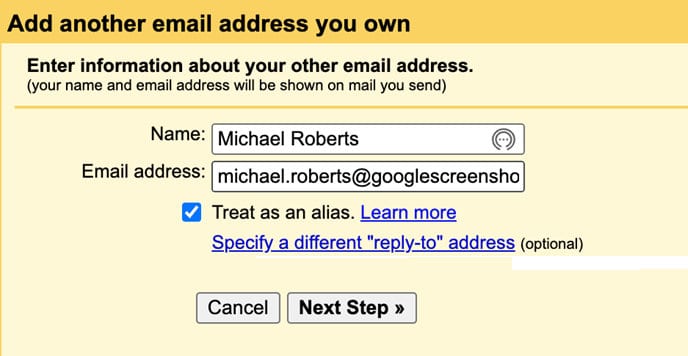
- Enter the outgoing server information and port that is included on the Bluehost site
- Enter your username and password from Bluehost
- Select the radio button next to Secured connection using SSL
- Click “Add Account.”
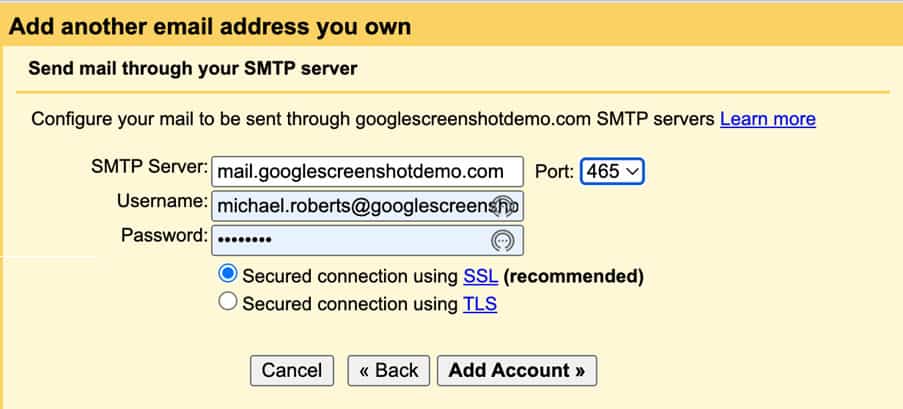
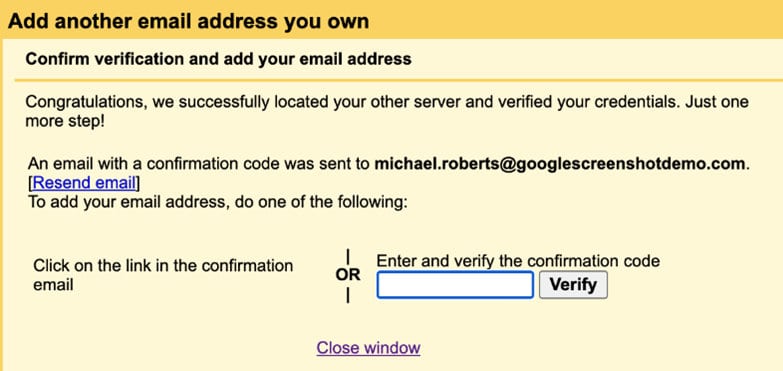
You will receive a verification notice. Follow the on-screen instructions and either click on the link in the email or enter a confirmation code in the window.
Step 5: Final Configuration
At this point, your email is set up so you can send and receive business emails from your regular Gmail account. Work messages will have labels to make it easy to track business emails.

When sending out messages, you should be able to select the account from which you are sending.

To test your setup, send an email to friends or your other email accounts to ensure that everything is set up correctly, and either reply or ask your friends to reply to make sure everything is working as expected.
And that’s it! You now have Gmail with your custom domain email for free!
If you have any issues, comment below and I’ll do my best to help you solve them.
How to Enable Gmail to Work with Your Custom Domain Name Through Google Workspace
Another option you have, if you’re willing to spend a few dollars a month, is to pay for an account with Google Workspace.
Google Workspace gives you a custom email address and access to several Google business productivity and communication tools, including:
- Google Drive – cloud storage
- Google Docs – cloud work processing
- Google Sheets – cloud spreadsheet tool
- Google Slides – cloud presentation tool
- Meet – a cloud-based video-conference platform
- Calendar – cloud-based calendar
Google Workspace makes it easier to share documents and collaborate with others in your organization. It can help your business look highly professional. The service costs between $7 and $22 per user, per month, but most small businesses can use the Business Starter package at $7.
There is also a Google Workspace Individual service, which includes some business tools for $9.99 a month. However, this service does not include a business email address.
Creating your Google Workspace account
Many web hosts, including Bluehost, allow you to create a Google Workspace account directly from their interface. This is the easiest way to set up a Google Workspace as all configurations are pre-set up.
If it isn’t an option, head over to Google Workspace and click the “Get Started” button. Follow the wizard and answer questions about your business name, number of employees, and the region where you are located. Although the process is pretty straightforward, we’ve created a detailed guide for setting up your email domain with Google Workspace.
You’ll also be asked for your full name and current email address, and whether you have a business domain. If you have a domain you can enter it in, or you can search for one and buy it there directly.
You’ll be asked for a username and password, shown pricing options, and asked for payment information. You can try it for free for 14 days before being charged.
Get Started with Your Custom Gmail Email
In this post, we shared two methods for using the familiar Gmail interface with your work email. In the free method, you need to have an existing web hosting account first, and then you will have to do some configuration work to get everything running smoothly.
The second option is Google Workspace. This option is significantly easier but costs a little bit more.
If you have any questions or comments, leave a message in the comments, and we will do our best to answer.


hey thank for the article,
it seems that it needs an update, I checked the GoDaddy instruction but could not find the Workspace Email they have removed it, if still there is a way ill be more than happy to learn?
This is really strange. I checked with GoDaddy and they told me you are correct. Then I logged in myself to one of my accounts with them and there it was. I’ve updated the info above since it looks like they changed up their dashboard a little. Please give it a try and let me know how you manage.
I’m currently having the same problem with GoDaddy in that there is no “Workspace Email” option. Having followed the instruction above, I’m still stuck at this point but would love to get it sorted ASAP. Any advice would be much appreciated 🙂
Hi Raychel,
I have checked multiple go daddy accounts and you are correct in that some of the accounts do not have the workspace option. You would need to contact them to sort this.
Great article, thank-you for all the details! One small snag I’m having, though:
I have HostGator, and in CPanel I successfully forward the emails to my gmail. But, the emails *also* fill up my HostGator webmail, when I just want it to forward only. Do you know how to stop it from filling up the webmail inbox?
Thank-you!!
Hi Eric,
Do you have a dedicated server or a shared server. Hostgator only allows forwarding of emails to gmail if you have a dedicated server. I am happy to walk you through it if this applies to you.
Thanks for the clarification, Jason. I have shared hosting (cheapest plan), so I guess it’s not possible to bypass the inbox on HostGator? It does allow forwarding (i.e. the emails do end up at Gmail), but it doesn’t seem to allow me to fully bypass the HostGator email, because it also dumps the emails into the webmail inbox. I need to occasionally login to the webmail (RoundCube) and just empty out the inbox. Unless you know a way around this? Thanks, again!
Superb blog! Do you have any suggestions for aspiring writers? I’m planning to start my own site soon but I’m a little lost on everything. Would you suggest starting with a free platform like WordPress or go for a paid option? There are so many choices out there that I’m totally confused .. Any tips? Kudos!
WordPress will suffice. Its a great platform. Good Luck!
Thanks!
For people with problems; the “Less secure apps” -method didn’t work for me. At the SMTP part Google didn’t accept my password no matter what. I then enabled the 2-Step verification for my account and then went with the “app-specific password” method and it worked fine!
Hi, Jason! First of all, I want to thank you for this one. Everything went smoothly with my domain and Gmail account, thanks for your kind and beautiful explanation.
But, I plan to unsubscribe from web hosting along with the email, because I no longer need the website. My question is, will this ‘hack’ stop working when I stop paying for the web & email hosting? Looking forward to your reply. Thank you.
Hi Lita,
Your Gsuite email, now called Workspace will not stop working after you cancel hosting and email hosting. When you signed up for a hosting plan they can manage your emails from a completely different server which allows you to cancel and still have access to those emails. If you used Workspace you will still have access to it.
Hey! Quick question. I currently own a domain. Must I still go through G Suite or can I use the current domain that I currently own for my custom email?
Hi Jason,
Thanks for the info.
I did this back in the day: linked my professional account to a gmail account to be able to workout of the gmail interface, but for my professional account i also set up a google account, to be able to access all the services such as drive.
I have now decided to move it all to gsuite as it gets quite messy as workload increases with the personal and professional emails on one interface.
However, since i already have used my professional account to set up a personal google account to take advantage of the google services, how can i transfer or convert that specific professional email account to gsuite? Eg to transfer rachel@apple.com from personal google account to gsuite ( emails, files etc)
From what i can tell you cannot do such a thing? Would the best option be a new professional account for gsuite (eg rachel123@apple.com), and transfer ownership of all the files, including shared files to the new professional account, then delete the original professional email linked to google account followed by changing the user name on Gsuite from rachel123 to the original rachel@apple.com?
Would that work?
Worried that deleted accounts cannot be recreated and that files on drive in general will not transfer properly in the way i have described.
Many thanks in advance!
Then
can you guys help me make my own email for free please thank you
I want my email to be safe and secure.
Thanks for the great article!
I’ve got a personal Gmail account and recently bought a personal domain (for myself, for fun). I’m trying to connect the two (i.e use an alias + forward) but seems like your guide requires that I have a provider email address (of GoDaddy or similar) and forward it.
How can I do it without getting a GoDaddy email?
Thanks 🙂
Registering a domain name is basically good for reserving that name. But you’ll need a email hosting plan in order to use it in your email address.
Hi Jason,
Thanks for the guide. Works like a charm.
One question though. Should I turn the ‘allow less secure app’ back to ‘off’?
Never to old to learn something new. Thanks
hi jason, i just open a Gsuite account and i wanted to use it for email marketing so gsuite gave me a domain and email address. how can i generate a custom domain and what are the steps i must followto allow my email to be delivered ..i really need help on this and i wish someone can really help me so as to start sending my bulk email campaigns.looking forward to hear from you soon
Hi Daniel,
If you have not registered a domain yet, that’s the first step, you can use Godaddy for that. Next you will need to sign up for an email marketing tool like constantcontact. They will walk you through setting up your account to send bulk email from your custom domain name. Google Workspace (formerly G suite) is not the right tool for email marketing campaigns.
Hello! I used to create aliases very easily through gmail, and still have one that I set up late last year that works, but suddenly no matter what I do, I can’t create another one for a new domain. I have followed your instructions, and it just loops back to showing my main gmail page. I have also tried using my domain smtp settings and that does the same thing. I’m pulling my hair out as this is the easiest solution for having everything available to me. OH I should mention that I was able to set up my domain email through gmail easily on my Android phone.. but the settings don’t synch with my computer. I’m completely baffled! Any help or tips would be greatly appreciated!
Dear Jason
I tried to get a 20% coupon code for Switzerland but Google tells me that it is not valid for my country. Is there a possibility to get the 20% reduction anyway?
Hey Roger,
Yes unfortunately there are ineligible countries for the 20% off, and Google is very strict about it. I don’t know of any way to get around that.
Two ways you could get around this:
A. Although global codes don’t work, occasionally the Google representative office for your country issues its own vouchers that do. Call them or visit them and ask.
B. Sign up using a “VPN Browser” with built-in always-on VPN that makes you appear based in the United States. Only use this browser for all your setup, configuration, and payment process from A-Z. After that it should be ok if you go back to use any normal browser