Keeping your Gmail inbox organized and maintaining a clutter-free inbox can be an ongoing battle, but there are some tools and tips that can help you tame the beast.
When it comes to Gmail, there is no one clear system for how to stay organized. There are many different ways to set up your inbox, and what works for one person might not make sense for another. Read on, and you’ll be sure to find a trick or two that works for you.
What is a Cluttered Inbox?
A cluttered inbox is a state of disorganization in your email account, characterized by a large number of unread emails, spam messages, and unnecessary subscriptions. It can lead to feelings of overwhelm, stress, and decreased productivity. A cluttered inbox can also make it difficult to find important emails, leading to missed deadlines, lost opportunities, and damaged relationships.
Benefits of a Clean Inbox
A clean inbox, on the other hand, is a state of organization and efficiency in your email account. It allows you to quickly find and respond to important emails, reducing stress and increasing productivity. A clean inbox also helps you to stay focused on your priorities, avoid distractions, and maintain a healthy work-life balance. By keeping your inbox organized, you can also reduce the risk of missing important emails, improve your communication skills, and enhance your professional reputation.
9 Tips for Managing and Organizing Your Inbox
Each of the tips below can be helpful on its own. If you’d like to use them all, great. But even if some of them are not right for the way you work, you can still use the others to help you work more efficiently.
1. Test Different Inbox Types
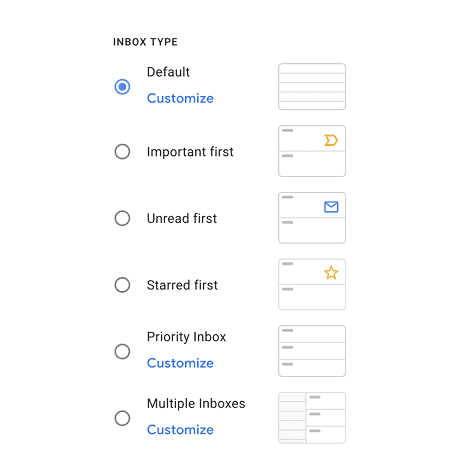
Gmail has six preformatted inbox types to help you organize your inbox. Be sure to try each of them out and see which one is right for your needs.
- Default — This is what you were given when you began your account. Here, emails are displayed in chronological order, with the newest email appearing first.
- Important First — This option orders emails based on their importance. You can mark an email as being important by clicking the tab on the left side of the email, and turning it yellow. Over time, Gmail learns which emails you consider important and prioritizes your inbox accordingly.
- Unread First — This option shows any unopened emails at the top, regardless of importance.
- Starred First — You can “star” certain emails or senders on the left side of the email, and they will show up first in the future.
- Priority Inbox — Gmail prioritizes which emails are displayed according to how you’ve marked them in the past, the labels you use, and other rules you apply. This helps keep the primary inbox focused on important emails.
- Multiple Inboxes — For those with more than one Gmail account, this inbox lets you view up to five custom sections alongside your inbox and easily alternate between them. This setup can prevent a cluttered mailbox by separating different types of emails.
2. Create Labels
One of the top tips from email management gurus is to aim for “inbox zero.” It’s an approach to always keep your inbox empty or almost empty. To do this, each time you receive an email, you’ll need to either delete it, respond and archive it, or move it to another folder.
You need a smart system to do this so you can always quickly and simply find filed emails later. Some email providers have folders, but Google calls them Labels. To create one:
- While in an email, go to the “Move to” folder icon at the top
- At the bottom, click “Create New”
- Name the label
- Save
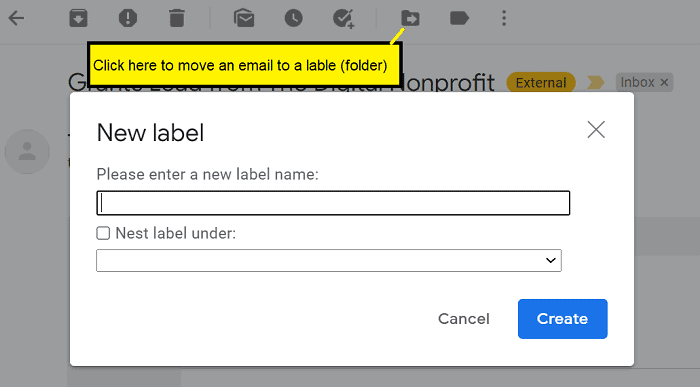
With Google Labels, you apply multiple labels to one email. You could create a label called “Work,” and nested within it, you might have other labels titled for each client, project, or aspect of your job. In this way, you can find any of them in “Work” or by their individual labels.
3. Use Filters
Filters are an easy way to have your emails added to the appropriate label automatically. This way, they don’t show up in your inbox but instead are filed for you to review later when you have the time. You’ll know that some labels contain emails that are always important, so when a new one lands there, you can read it right away. If an email lands in a less important label, you’ll know you can wait until later to read it. Gmail automatically sorts and prioritizes emails based on the filters you set, making it easier to manage your inbox. This can really help you prioritize your time at work. To create a filter:
- Go to the settings gear/all settings
- Click the “Filters and Blocked Address” tab
- Create a new filter
- Choose to filter by the sender, subject, keywords, or file size
- Click “Create filter”
- Check “Skip the inbox” and “Apply Label”
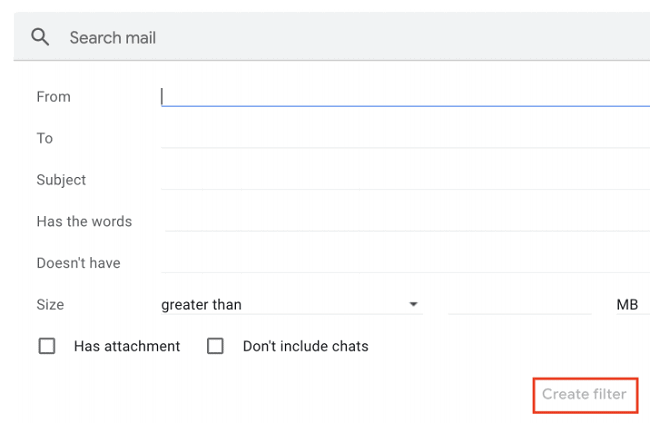
Now, your email will go directly into the folder/label you’ve selected and never your inbox. But you’ll still know you have new messages by the bold number next to the label. Once your filters are set, you can easily edit or change them via the settings gear icon if your needs change.
4. Color Code Your Labels
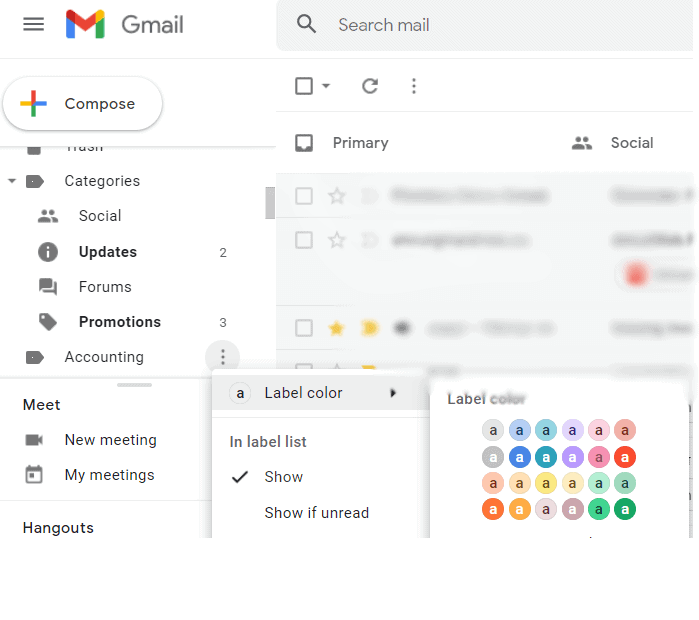
You can further distinguish your various labels by applying colors. For example, if you have a label titled “Approval,” you might color it red, so you know it’s important. Labels for subscription newsletters might be green, and so on. To color code a label:
- Hover over the name of the label
- Click on the dots that appear next to the label name
- Click label color
- Select a color
5. Use the Send & Archive Button
One of my favorite Gmail decluttering tricks is the “Send & Archive” button. Usually, when you reply to an email, you’re done with it unless and until you receive a response. However, by default, Gmail will keep the original email and your reply in the inbox. By enabling send and archive, once you reply, it will automatically save them in an archive folder called “All Mail.” You can still access them as often as needed.
If someone replies to your archived email, it will show up in your inbox again. This is an excellent option for one-off emails that you do not need to check on in the near future. Enable it in the Settings section by clicking the gear in the upper right corner, looking under the General tab, in the section called Send and Archive. Select “Show Send and Archive button on reply” and you’re good to go.
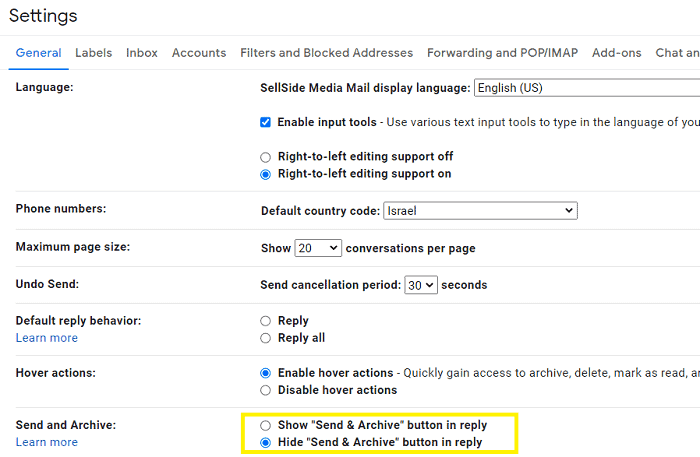
Once you’ve done that, all email replies will automatically be archived. If you use this feature, be sure you label the email before you reply.
6. Snooze Low Priority Emails
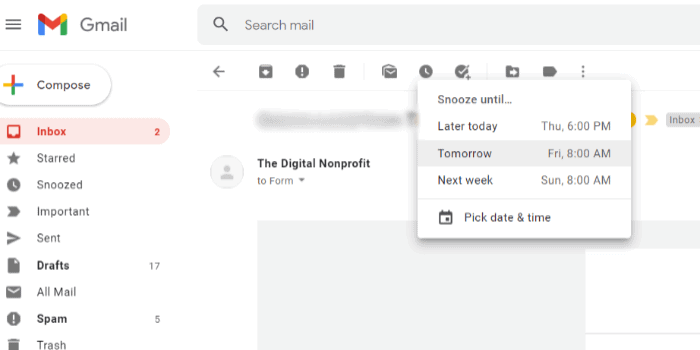
The “Snooze” option allows you to postpone emails and remove them from your inbox until later. Your snoozed email doesn’t go away forever, just for now. It will come back to the top of your inbox based on the settings you’ve chosen. Snooze email for as little as a few hours or more than a week. To enable this feature:
- In the email, click the clock icon at the top
- Select tomorrow, this weekend, next week, or choose a custom time
7. Schedule Tasks
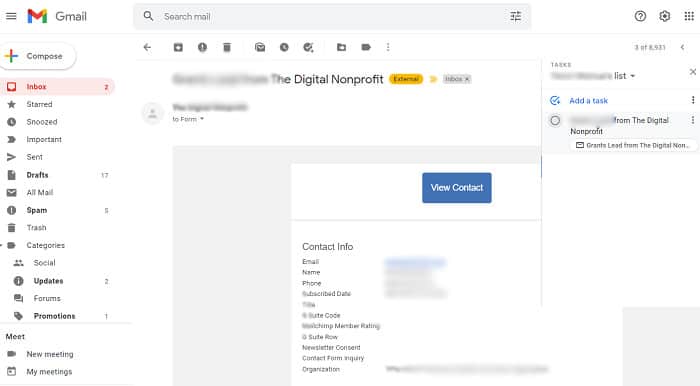
There will be times when you open your email and see that it requires some action that you cannot handle at that moment. Instead of leaving it in your inbox, schedule it as a task. Once you make it a “task,” you can archive it, so it disappears from your inbox. To create a task:
- In the email, click the circle with a checkmark icon at the top
- Add details, if needed
- Set a time and date to receive a reminder
8. Eliminate Spam
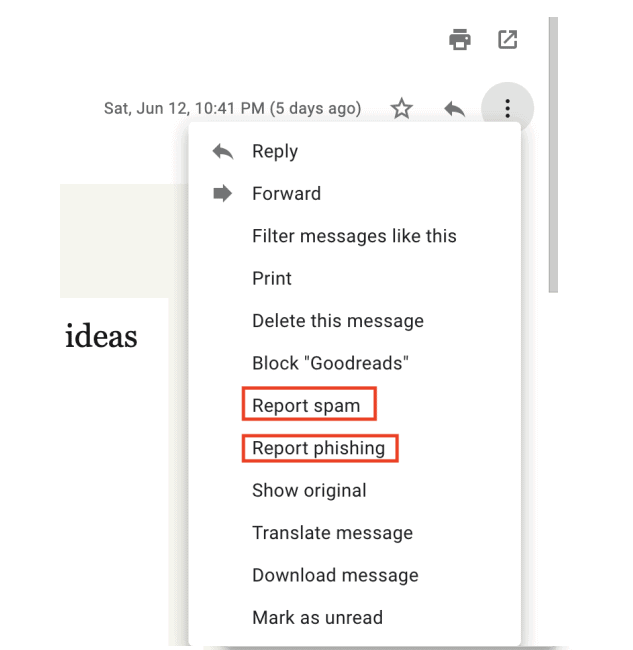
Sometimes we receive random messages from people we don’t know or newsletters we didn’t sign up for. Eliminate and minimize these by reporting them as spam or phishing so Gmail can block them in the future and prevent you from receiving more. Additionally, managing email notifications can help reduce distractions and keep your inbox focused. Do this by:
- In the email, click the three dots in the upper right corner of the message
- Select Report Spam or Report Phishing
When you do this, Google will receive a copy and prevent you from receiving anything from that sender again. Choose “Report Phishing” if the sender has asked for personal information.
9. Add Useful Gmail Extensions
Of course, you could also opt to use a Gmail extension to help you organize your inbox. You can try several programs for free such as Mailbutler, Boomerang, or Mailstorm, that include additional features such as mail tracking, recommended send times, and automated follow-up for messages. With some, you can even identify bundles of related mail for quick decluttering. They’re also helpful for prompting you to continue decluttering by learning your behaviors and making recommendations to keep your inbox clean and clutter-free. Additionally, you can use the Gmail search bar to find specific emails, such as archived or muted conversations, enhancing your email management.
In summary, the best way to keep your inbox decluttered is to set up a system that works for you and stick to it.
While it may take additional time initially to set up your preferences and begin decluttering, doing so will save you loads of time in the long run. Decluttering your Gmail now is an investment in a clutter-free future and we can all subscribe to that.
Very interesting and helpful.
Will apply asap.